Tags: How to become a photographer. Photography tutorial
Back to photography tutorial lesson 1
We have already found three important settings concerning the light: the aperture, the speed, and the sensitivity. Let’s detail them:
APERTURE
Depending on the lenses, the aperture of the iris of the diaphragm can go from f/1.2 to f/32. In a lens, the smaller number “f” is, the bigger the aperture is and more light enters the CCD sensor. And vice versa: a big number “f” means a small aperture and, consequently, less light. Generally, the maximum aperture depends on the focal length of the lens: the longer the focal length is, the smaller the maximum aperture is. But aperture is not only important to control the quantity of light going into the CCD sensor.
It determines to the depth of field (area of focus), which is the area where the subjects appearing in it are sharp, in focus. The subjects being out of that area are blurred, out of focus. The smaller the aperture is, the larger the depth of field is.
SPEED
The speed the shutter flips up and down determines the time of exposure of the sensor. The low

speed will allow a long exposure and a fast speed a short exposure. Depending of the cameras, the speed can go from 30” (seconds) to 1/4000” (4000 times faster -or shorter than a second). Most of the cameras have to a feature called BULB which allows the shutter to be open as long as you want, for night photography.
SENSITIVITY ISO
The sensitivity of the CCD is measured in ISO units which go from 80 to several thousand, once again, depending on the camera. The higher the ISO number is, the more sensitive the CCD is to the light. Normally, on a sunny day, you must use 80 or 100 ISO. In dark areas, even during the day, you can use 200 or 400 ISO. On very cloudy and dark days, you can increase the ISO number.
During the evening and at night, very high ISO produce optical noise and, therefore, very high level of grain on the picture (you can avoid this problem by reducing the ISO and the speed, and by increasing the aperture; the use of the tripod is obligatory). Summarizing: The light is controlled through The aperture (f/xxx), The speed (“), The sensitivity (ISO)
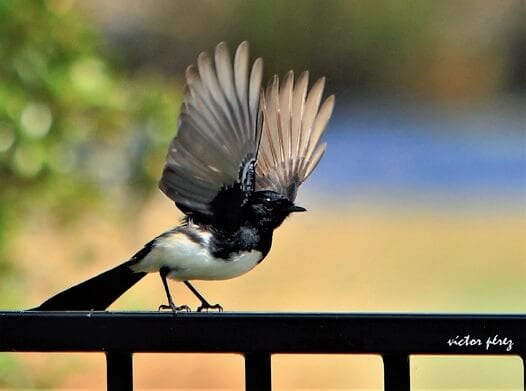
To freeze the movements of the Willie Wagtail, the speed of the shutter is 1/2500 s (2500 times shorter than a second), the aperture of the diaphragm f/4 and the sensitivity 400 ISO
LESSON 3:
HOW TO MANAGE THE SETTINGS
Note: The following content is for manual exposure. The settings -aperture, speed, and sensitivity- are related amongst themselves (see attached picture). Example 1: Bird flying On a sunny day, if you want to freeze the flight you must select a high speed: around 1/500, 1/640, for slow flights, or 1/2500, 1/3200 (or more) for fast flights. Remember that when the speed is very high, the flow of light going to the CCD sensor is limited. In this case, if you select ISO100, you must select a large aperture (f/7.1, f/6.3, f/5.6, …).
For the opposite, if you want to transmit the movement of the wings by showing them blurry, you must reduce the speed and, therefore, to decrease the aperture. On a dark day, you can use the same settings except that the sensitivity should be increased to compensate for the surrounding light conditions. Example 2: Bird on a branch As you want to get the maximum of details, you are better to use a slow speed (1/100, 1/125), a small aperture (f/8.0, f/9.0) and a low ISO (80, 100, depending on the daylight).
But if the bird is moving, you must slightly increase the three settings: speed, aperture, and ISO. Example 3: Landscape on a sunny day Obviously, in this case, you don’t need high speed (except if there are birds flying around). Then, the speed could be 1/125 or 1/160. The aperture doesn’t need to be large: f/9.0 or f/10 (or less to enlarge the depth of field) will be enough. Depending on the surrounding light, your ISO can still be 100. For other conditions, you must take into account the rules of the following exposure triangle.


